Facing major damage to your home is an incredibly stressful experience. Whether it is a slow water leak that finally rots through your kitchen flooring, a severe convective storm that rips shingles off your roof, or a devastating fire, your property is your most valuable asset. When disaster strikes, you rely on your homeowners insurance policy to step in and make you whole.
However, the real-world claims process is rarely as simple as submitting a few photos and receiving a direct deposit the next morning.
In today’s market, the claims landscape is more complex than ever. According to the J.D. Power U.S. Property Claims Satisfaction Study, the average cycle time from the First Notice of Loss (FNOL) to final payment has reached a historic high of 40.7 days. This delay is driven by a volatile mix of severe weather events, labor shortages in skilled construction trades, and updated regulatory rules.
Fortunately, you do not have to navigate this system blindly. By understanding exactly what happens behind the scenes after you file, you can avoid common administrative bottlenecks, protect your policy limits, and speed up your final payout. This comprehensive, step-by-step guide explains exactly what happens when you file a home insurance claim in 2026.
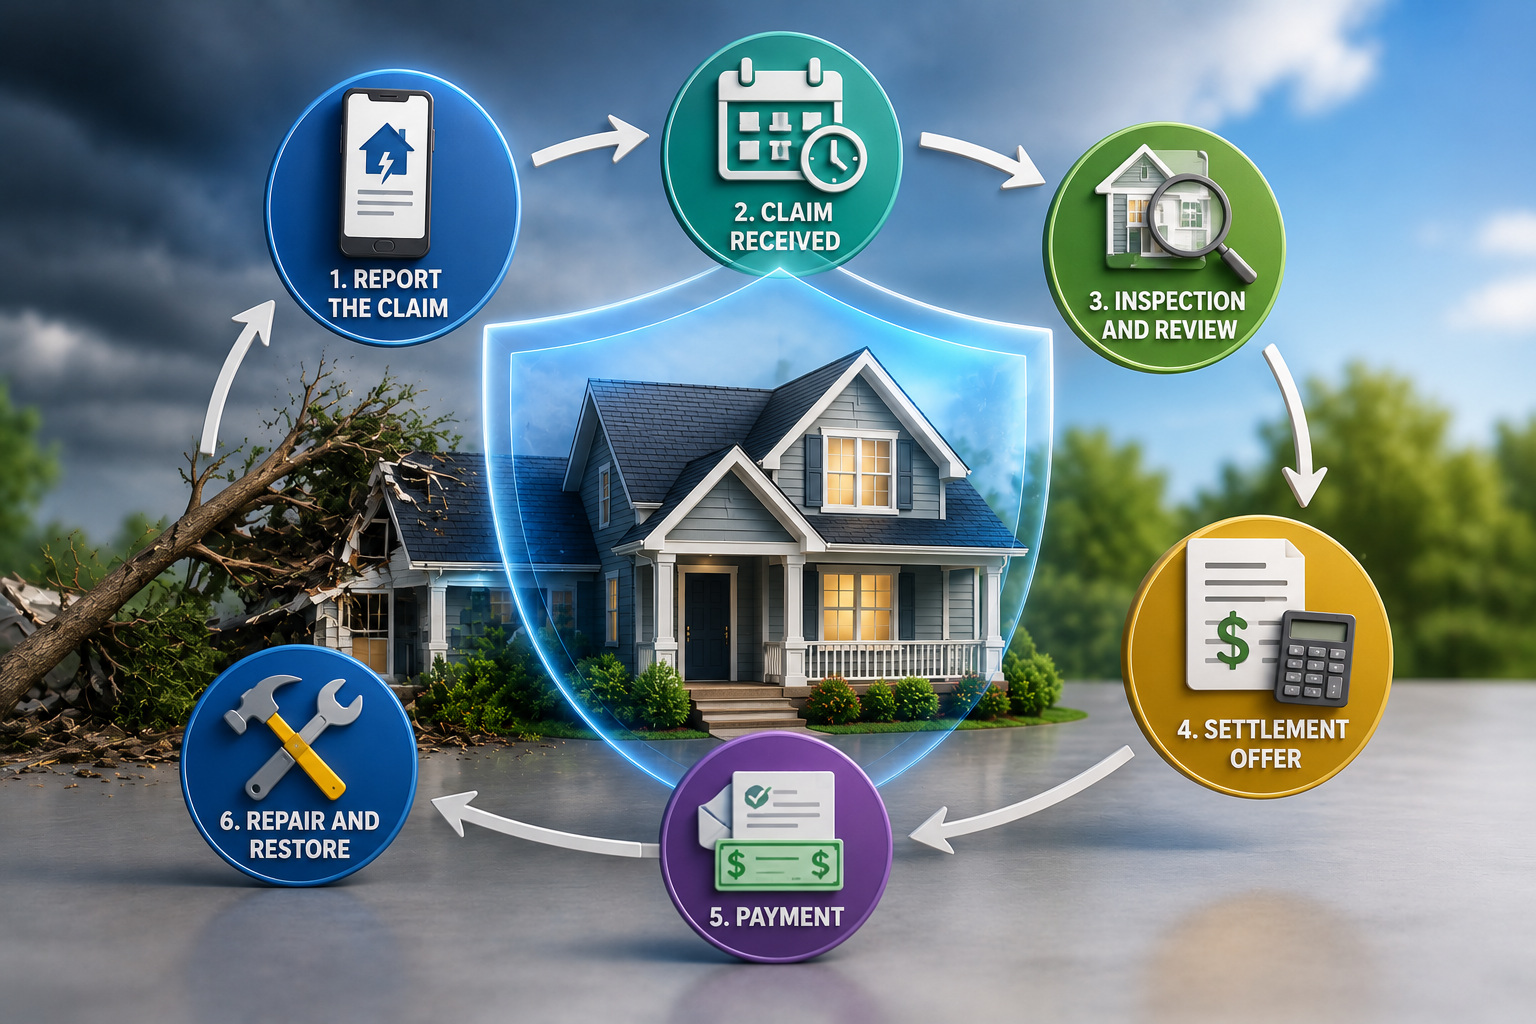
Phase 1: The Incident and Emergency Mitigation
Your insurance claim does not begin when you call your agent. It begins the moment the physical damage occurs. What you do in the immediate aftermath of an incident directly dictates whether your claim is approved, delayed, or outright denied.
The Legal Duty to Mitigate
Every standard homeowners insurance policy (such as an HO-3 or HO-5 contract) contains a clear legal clause requiring you to prevent further damage to your property. This is known as your duty to mitigate.
If a windstorm shatters a window, you must board it up to keep rain out. If a pipe bursts in your basement, you must shut off the main water valve and arrange for a water extraction team to dry out the space.
If you fail to take these basic, reasonable steps and additional damage occurs as a result (for example, if mold spreads through your walls because you waited five days to dry the drywall), your insurance carrier has the legal right to deny coverage for the subsequent damage.
Documenting the Scene
Before you touch anything, throw away damaged materials, or begin cleaning up, you must create a comprehensive photographic and video archive of the scene.
Take wide-angle photos of entire rooms to show the full scope of the incident.
Capture close-up, high-definition shots of specific structural damage, model numbers on ruined appliances, and water lines on walls.
Avoid discarding any damaged personal property until an insurance representative has personally inspected it. If you must throw away ruined items for sanitary reasons (such as spoiled food or water-logged carpets), document them thoroughly and keep your receipts.
Phase 2: First Notice of Loss (FNOL)
Once your property is stabilized, you must officially notify your insurance company. This initial step is called the First Notice of Loss (FNOL).
In 2026, carriers offer multiple digital paths for FNOL, including mobile apps, online portals, and traditional phone lines. The quality of the information you provide during this initial step is critical.
Research highlighted in the Decerto Claims AI Guide shows that claims submitted with incomplete or inaccurate intake data take 30% to 50% longer to resolve. This delay occurs because claims adjusters must spend their initial hours correcting basic information (such as policy numbers, mortgage details, or damage classifications) that should have been processed correctly on day one.
When submitting your FNOL, provide:
Your exact policy number.
The precise date, time, and cause of the incident.
A detailed list of damaged rooms, structural components, and high-value personal belongings.
Any police or fire department reports if the claim involves theft, vandalism, or fire.
Your initial photo and video documentation of the damage.
Phase 3: Triage and Adjuster Assignment
As soon as your FNOL enters your insurance provider’s system, it undergoes an automated triage process. In modern claims departments, this triage is increasingly managed by advanced algorithms.
Low-Complexity Fast-Tracking
If your claim is classified as low-complexity (such as a single cracked window or a minor windstorm claim with localized shingle damage), your carrier may route it through Straight-Through Processing (STP).
According to the VCA Software Insurance Technology Guide, carriers are increasingly using automated systems to resolve simple claims up to 75% faster. If your claim qualifies, an AI system may review your photos, verify your coverage limits, subtract your deductible, and approve your payout within hours, without requiring a human field inspection.
High-Complexity Routing
If your claim involves major structural damage, water infiltration across multiple levels, or severe liability risks, it is assigned directly to a professional claims adjuster. There are three primary types of adjusters you may interact with during this phase:
Staff Adjusters: Full-time employees of your insurance company who represent the carrier’s financial interests.
Independent Adjusters: Third-party contractors hired by your insurance provider. They are often brought in to handle high claim volumes following major regional storms.
Public Adjusters: Independent professionals you can hire yourself to represent your personal interests during a complex claim. They usually charge a percentage-based fee (typically 10% to 15%) of your final settlement payout.
Phase 4: Investigation and Damage Assessment
For standard and high-complexity claims, your assigned adjuster will schedule an in-person or virtual property inspection. Their job is to verify that the damage was caused by a covered peril, document the full scope of the loss, and write an official repair estimate.
During this investigation, the adjuster will focus on four key areas:
Origin of Loss: They must determine the exact cause of the damage. For example, if your basement is flooded, they need to verify if the water came from a sudden, covered pipe burst or an excluded external flood event.
Coverage Verification: They will review your policy documents to confirm the incident occurred within your active coverage window and is not barred by specific policy exclusions.
Damage Quantification: They will measure rooms, assess structural framing, test materials for moisture, and verify which items must be repaired versus completely replaced.
Mitigation Audit: They will check to ensure you took prompt, reasonable steps to stabilize the property immediately after the incident occurred.
Modern Assessment Technology
Adjusters no longer rely solely on tape measures and ladders. In 2026, carriers frequently use advanced tools to improve inspection accuracy. They may deploy high-definition drones to safely inspect steep rooflines, use thermal imaging cameras to locate hidden moisture pocketing behind drywall, and run automated damage-calculation software to generate instant repair estimates based on local material rates.
Phase 5: Adjudication and Valuation
Once the investigation is complete, the insurance company begins the financial valuation of your claim. This is where the specific terms of your policy contract directly dictate your payout amount.
Replacement Cost Value (RCV) vs. Actual Cash Value (ACV)
The valuation method outlined in your policy declarations page determines how your payout is calculated:
Replacement Cost Value (RCV): Covers the actual, real-time cost to repair or replace your damaged property with new materials of comparable quality, without deducting for wear and tear.
Actual Cash Value (ACV): Pays only what your property was worth at the moment of the loss, factoring in a deduction for age, wear, and physical depreciation.
To understand how depreciation is calculated under an ACV policy, consider the following mathematical formula:
Under an ACV policy, your insurer will subtract that $10,000 of depreciation from your initial payout. Under an RCV policy, the insurer will ultimately pay the full $20,000 required to install the new roof (typically split into an initial ACV check, followed by a second check once you submit proof that the repairs are complete).
Deductible Subtraction
Every property claim is subject to your policy’s deductible. Your insurer does not ask you to write a check for this amount; instead, they simply subtract your deductible from their final settlement offer:
According to market research from the Matic 2026 Home Insurance Predictions Report, the average home insurance deductible rose by 22% in recent years as carriers shifted more upfront risk back to property owners to keep premium rates manageable.
This means that if you have a $2,500 deductible and your adjuster estimates your structural repair costs at $15,000, your actual payout check will be:
You are responsible for paying the remaining $2,500 directly to your chosen contractor to complete the repairs.
Phase 6: Payout Mechanics and Mortgage Lienholder Rules
When your claim is approved, receiving the money involves navigating strict legal and financial rules, especially if you have an active mortgage on your property.
Why the Bank Co-Signs Your Check
If you have an active mortgage on your home, your lender is listed as a lienholder on your homeowners insurance policy. Because the physical structure of the home serves as the collateral securing your loan, the bank has a direct financial stake in ensuring the property is repaired to its original standard.
Consequently, your insurer will make the settlement checks co-payable to both you and your mortgage company. To access these funds, you must send the check to your mortgage provider’s claims department.
The bank will place the money into a restricted escrow account and release the funds to you and your licensed contractor in progressive phases (often called draws) as construction milestones are met and verified by field inspectors.
Phase 7: Supplemental Claims and Final Resolution
During major property renovations, contractors frequently uncover hidden, secondary damage once they tear away ruined drywall, flooring, or roofing layers. For example, a team replacing hail-damaged shingles may discover rotted plywood decking beneath the surface that could not be seen during the adjuster’s initial drone inspection.
If your contractor finds additional damage, do not panic. Your claims process allows for modifications via a supplemental claim.
Your contractor should take photos of the hidden damage, write a detailed supplemental invoice, and submit it directly to your adjuster before proceeding with those specific repairs. The adjuster will review the additional documentation, run an updated valuation, and issue a supplemental check to cover the extra costs.
Once all structural repairs are complete, your contractors are paid, and your personal property is replaced, your claims file is officially closed.
Home Insurance Claims Payout & Timeline Simulator
Estimate your actual payouts under RCV or ACV policy terms, see how deductibles and depreciation are calculated, and simulate your processing timeline based on 2026 industry cycle times.
1. Claim & Policy Parameters
The total invoice cost to restore your home or property to its original, pre-loss condition.
RCV pays to replace with new items. ACV deducts for age and wear-and-tear.
Used to calculate depreciation: $\text{Depreciation} = \text{Replacement Cost} \times \left( \frac{\text{Age}}{\text{Useful Lifespan}} \right)$
The out-of-pocket risk you retain. This is subtracted from your final check.
2. Projected Claims Payout Report
Initial Check (ACV check)
$0
Issued post-inspection
Recoverable Depreciation
$0
Held in escrow until repairs finish
Financial Calculation Sheet
Gross Estimated Loss:
$0
Calculated Depreciation:
-$0
Policy Deductible:
-$0
Your Total Out-of-Pocket Cost:
$0
Simulated 2026 Processing Timeline
Projected Claim Cycle Time:0 Days
MitigationIntakeAdjusterAdjudicationRepairs
Calculating escrow routes…
Summary of the Home Insurance Claims Process
The table below outlines each step of the property claim journey, detailing key responsibilities, average cycle times, and expert strategies to prevent delays.
Claim Phase
Key Participant Responsibility
Average Timeframe
Strategy to Avoid Delays
1. Emergency Mitigation
Policyholder must stabilize property and document the scene.
Immediate (First 24 hours)
Take wide-angle photos and videos before cleanup; do not discard damaged items.
2. FNOL (Intake)
Policyholder submits claim details to carrier.
1 to 2 days after incident
Provide complete, accurate policy and mortgage details to prevent cycle time inflation.
3. Adjuster Inspection
Adjuster assesses damage in person or virtually.
3 to 7 days after filing
Accompany the adjuster during their walk-through; highlight hard-to-see damage.
Verify if your policy pays Replacement Cost (RCV) or Actual Cash Value (ACV) before signing.
5. Mortgage Escrow
Lender processes and holds co-payable funds.
10 to 20 days (if mortgaged)
Submit your contractor’s active license and W-9 form to your bank’s claims team immediately.
6. Repairs & Supplement
Contractor completes work, submits hidden damage.
14 to 30+ days (varies)
Have your contractor submit supplemental photo evidence before fixing hidden damage.
Why Claims Are Taking Longer in 2026
If you find yourself waiting longer than expected for your claim to resolve, you are not alone. According to the Markel Insurance Industry Analysis, several macroeconomic and weather-related trends are stretching claim cycle times globally:
Extreme Catastrophe Losses: The frequency of severe weather events has increased dramatically. Severe convective storms, wildfires, and localized flash flooding create sudden surges in claim volume that overwhelm local claims adjusters and independent adjusting networks.
Elevated Construction Costs: Although overall inflation has cooled slightly, the cost of specialized building materials and skilled trade labor remains high. This makes repairs more expensive and extends the time required to source materials.
Supply Chain Disruption: Geopolitical trade friction has introduced tariffs and shipping bottlenecks that delay imports of structural components and raw building supplies, extending repair times for homeowners.
Customer Satisfaction and Cycle Times
Maintaining clear and easy communication with your insurance provider during these delays is essential to your overall satisfaction.
The relationship between claim resolution speed and customer satisfaction is direct. Data shows that policyholders whose claims are resolved in under 10 days report satisfaction scores that are 167 points higher than those whose claims drag past a month.
Furthermore, J.D. Power research reveals that customer satisfaction is more than twice as high when policyholders report that communication with their insurer was very easy, highlighting the importance of choosing a carrier with responsive digital tools and clear status updates.
Practical Checklist to Speed Up Your Claim Payout
To keep your claim moving forward as quickly and smoothly as possible, use this practical action checklist:
Mitigate Instantly: Take fast, reasonable steps to protect your property from further damage, and save every receipt for temporary repairs.
Submit a Clean FNOL: Provide clear, accurate policy details and comprehensive photos right away to avoid starting with data errors.
Coordinate with Your Mortgage Company Early: Contact your lender’s loss draft department as soon as your claim is approved to find out exactly what paperwork they need to release your repair draws.
Hire Licensed, Insured Contractors: Work with established local professionals who know how to document supplemental damage and communicate effectively with claims adjusters.
Keep a Detailed Claims Log: Write down the date, time, name, and details of every conversation you have with your insurance agent, adjuster, or mortgage company representative.
By taking a proactive, organized approach to your home insurance claim, you can systematically bypass common administrative roadblocks, secure your full policy benefits, and restore your home as quickly as possible.